All security video cameras are not created equal, and Guardian Protection’s video service just became even smarter.
From checking in on your pets to deterring porch pirates, the benefits of arming your home with video cameras are too many to list. But to really get the most out of your home security system, professionally installed and monitored security systems with really smart cameras are the way to go. They allow you to easily see what’s happening at home—anytime, anywhere—using your smartphone, tablet or computer. Even better, they don’t just passively record hours of everyday life; they work seamlessly with your smart home system and send you notifications when something is up.
But you probably don’t want notifications every time the wind blows. Now there’s a solution for that! Upgrading to our new Video Analytics feature, Guardian customers can have even more control over which video alerts they receive. This will give you a better handle on what’s going on at home and cut down unwanted notification noise.
Focus on alerts that matter
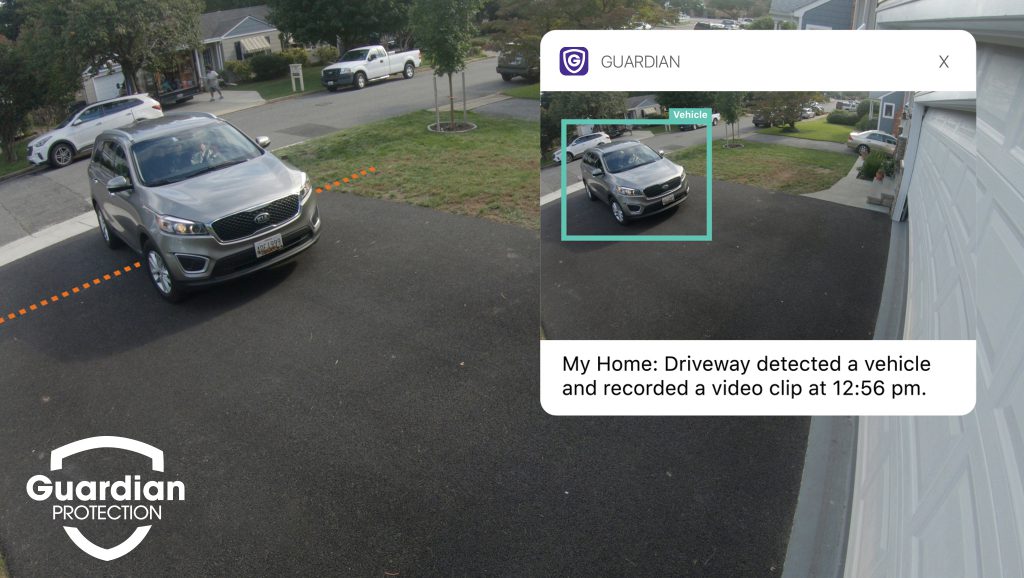
Video Analytics gives you smarter video alerts on what matters most to you, distinguishing important events from routine activity in real time. Using artificial intelligence, we can tell you whether a moving object in your driveway is a person, an animal or a vehicle and alert you based on your preferences.
Once something important is detected, you’ll receive an enhanced video alert with a thumbnail image showing what was caught on camera. Plus, when you view your video clips, playback begins where the action starts – helping to avoid troublesome long clips with little action.

Video Analytics help you spot what’s important, even when there is a lot going on. Receive email and text notifications whenever:
- A vehicle pulls into the driveway (but not every time a car drives by)
- A person loiters in a specific zone on your property (but not when the mailman comes)
- A pet jumps up on the sofa (but not when he’s walking around the house)
- A child leaves the yard (but not when the neighbor’s cat enters)
For even more security, your Video Analytics preferences can drive your light automation! For example, you can choose to have lights turn on only when a person or vehicle is detected in the driveway, but not an animal.
Set Activity Zones
Record the areas you care about and ignore the ones you don’t by drawing virtual fenced-in “zones” on your property. You can select custom zone shapes and even see when someone is lingering on your property by setting a minimum activity time.
Draw Virtual “Tripwires”
Placing “tripwires” in your home or on your property essentially lets you monitor the flow of traffic in important places. Tripwires create an invisible line for your camera to watch and then send you a recorded clip when an object crosses that line. For example, set one across your driveway that can detect cars coming and going. Tip: Your zones and tripwires can overlap!
How to Set Up Video Analytics
To get started, you need to set up your “rules” or preferences for Video Analytics via your customer account on the website:
1. Log into MyGuardianHome.com.
2. Select Video > Recording Rules > Add Rule
3. In the New Video Recording Rule window, select “Video Objection Detection.”
4. Select the desired camera.
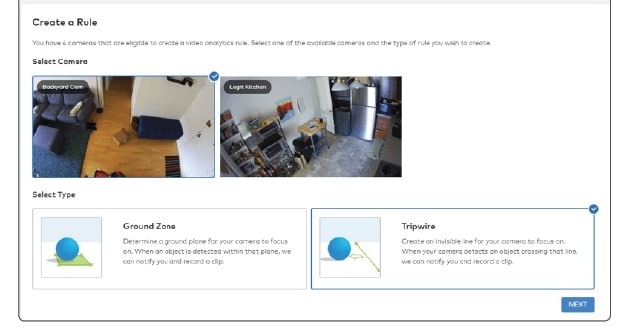
5. Choose the rule type (Tripewire or Ground Zone):
- Use a Tripwire rule when you expect a target to cross through the camera’s field of view or when objects enter or exit an area (e.g., a car pulling into or backing out of a driveway).
- Use a Ground Zone rule when you expect a target to loiter in the camera’s field of view (e.g., a person delivering a package on your front porch).
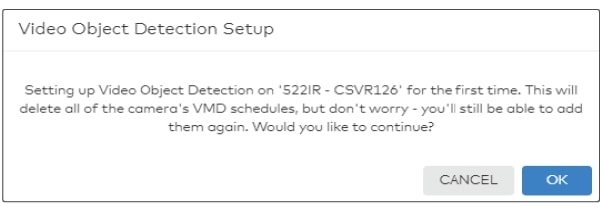
All Video Motion Detection (VMD) schedules associated with a camera must be deleted before setting up a Video Object Detection rule. When prompted with this warning, select “OK” to continue.
Camera Scene Setup
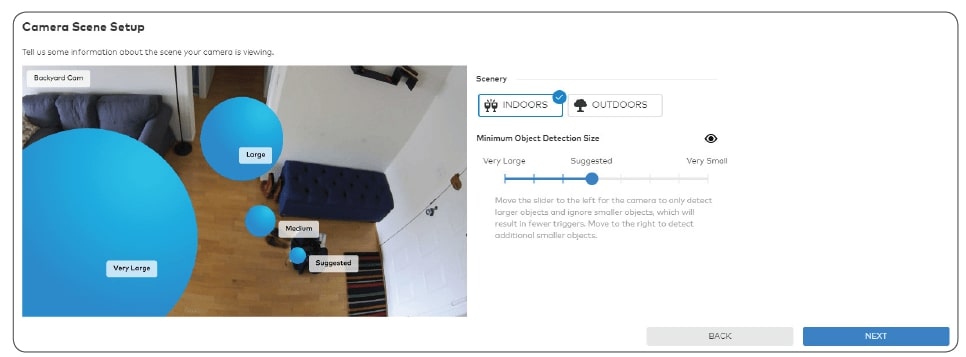
1. Set the scene to “indoors” or “outdoors” based on what the camera is pointing at.
2. The Minimum Object Detection Size slider determines the minimum size of objects detected by the rule. Setting it to “Very Large” will give you fewer triggers and ignore smaller objects.
How to Create Ground Zones
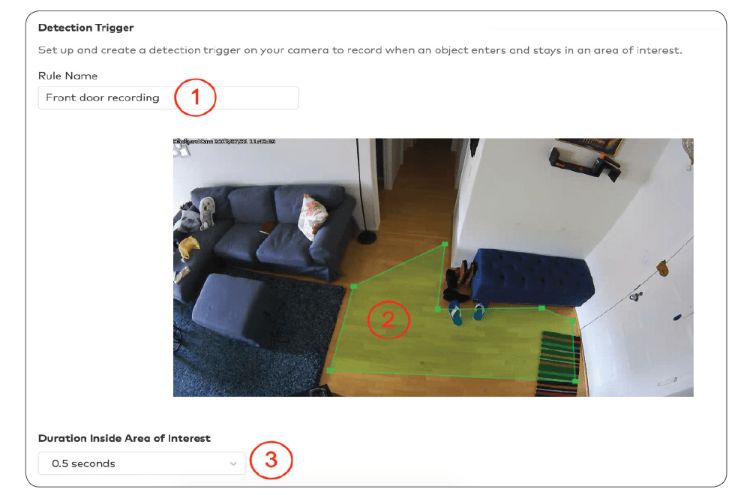
1. Name the rule to help you remember it later (e.g., “Front Door Recording”).
2. Select the area of interest by drawing a shape covering the ground where the object may linger:
3. Double-click inside the camera’s field of view to draw a new shape from scratch.
4. Click and hold inside the shape to move it around.
5. Hold right-click to rotate the shape.
6. Customize how long something must be inside the drawn shape before notifying you and recording a clip.
How to Create Tripwires
1. Name the rule to help you remember it later (e.g., “Hallway Crossing”).
2. Draw a line covering only the ground where the target’s feet will cross.
3. Select which direction to monitor the flow of traffic or choose to monitor in both directions.
How to Enable Light Automation
The “Light Automation” section will appear toward the bottom of the Video Object Detection Rule page.
1. Using the “Turn on selected lights for” dropdown menu, select how long the lights should turn on.
2. Select which lights the rule should apply to.
3. Specify what kind of event (person, animal or car) should trigger the light to turn on.
4. Select a time frame for the rule to occur.
Customize Your Rule Schedules and Notifications
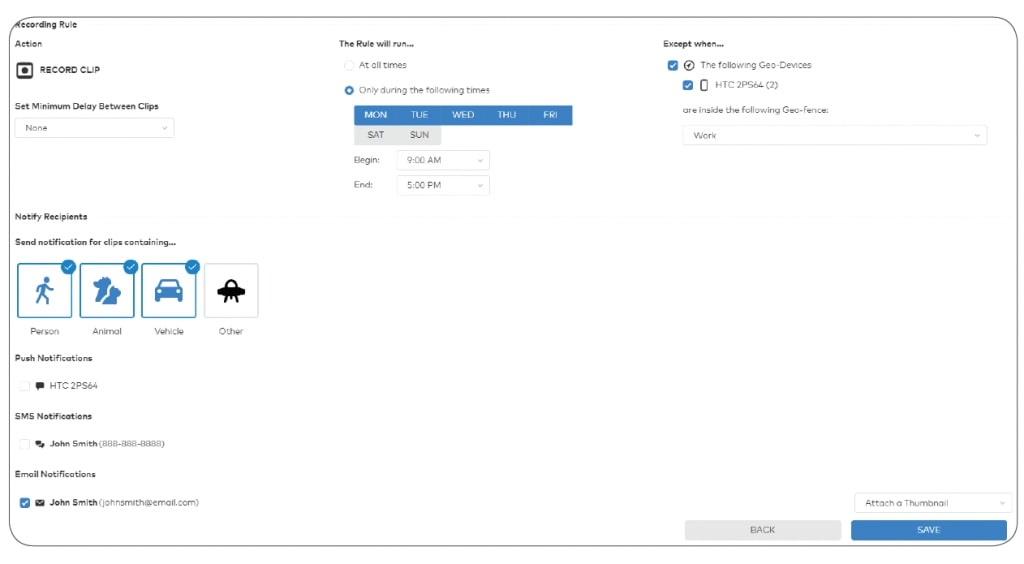
1. Select whether a rule should always be active or only during specific days/times, along with any exceptions to the rule. (Remember: Your lights won’t turn on during a time you’ve set to not record.)
2. Set the minimum time delay between clips.
3. Pick the types of objects that would need to appear in a clip for you get a notification (person, animal or vehicle).
4. Choose how you want to receive notifications. We recommend getting push notifications to your phone using the dropdown option to attach a thumbnail.
Viewing Your Video Clips
You can view your video clips by logging into MyGuardianHome.com or the app.
On the website, just choose “Video” and “Saved Video Clips,” and any clips with a person, vehicle or animal classification appear here by default.
If you are on the app, select the menu icon (the three horizontally stacked lines) after logging in. Select “Video” and then “Saved.”
To see clips only with a specific classification, or clips without a standard classification, change the selection in the Filters dropdown menu.

If you want to add this feature on to your camera system, please call 1.800.PROTECT (1.800.776.8328).

